I had been cautioned that driving lessons could be expensive, but there were also a couple of friends who went with cheaper instructors and ended up failing their driving tests. I decided to go with reviews instead of banking on my personal network, and called the best rated guys in my area. While that worked out well for me, and I don't know of what groundwork they do regarding quality control etc, it was interesting to note that they operated more like a franchise - my instructor was simply passed on my contact details and handled everything else himself.
We started off by an assessment of my driving skills: he picked me up from home, drove till an isolated spot in a residential area nearby, and got me in the driver's seat.
The first thing he asked me to do was adjust my seat. The basic thing is that you should sit back all the way in the seat, back to the rest, and be able to hold the steering wheel comfortably, with arms neither cramped nor fully extended, and left foot should be able to push the clutch pedal all the way in. The seat position determines your feet, while the incline determines how you hold the wheel. This is the most basic requirement, but getting it perfectly comfortable is something I actually didn't get right consistently for a while - more on that later. Once in place, the seat-belt goes on (obviously).
The next step was adjusting the rearview mirror. The tip is to get it to a point where you can see the corners of both rear side pillars (so it's symmetrically aimed backward), and can see the entire rear windscreen, so a bit of edge from the top and bottom, or as close to that as possible.
The wing mirrors don't need adjusting as long as they're set up right, so I never had to deal with them, but it's important to check they're not folded in and offer a full view starting from the sides of the vehicle, and aimed horizontally (so not tilted upwards or downwards).
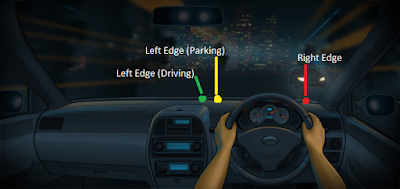
Cockpit drill done, the first time, it's important to find your spot on the road. To aid getting used to positioning, he placed a number of coloured dots on the dash, just below the windscreen. The car was parked about a foot away from the kerb, and he asked me to make note of which dot lined with my view of the kerb. I was to remember that as my reference when parking.
Once we started moving, he guided me to the point where we were in the middle of our lane, and asked me to make note of which dot aligned with the kerb at that point - that was my reference when driving. For the lane marker, I had to mentally note how far off the headlight seemed from the lane markers when the left dot was aligned, so I had a reference on both sides. The lane marker wasn't going to be too accurate, but that's not as big a deal as getting the left alignment I guess. To illustrate:
Finally, the second most important thing (or possibly the most) - stopping!
To stop, you first check the road ahead, rearview, and then the left mirror, if it's clear (i.e. no vehicle approaching from behind, cyclist or motorcyclist trying to cut from the left, etc), signal left as you look over your left shoulder, and start to brake while moving left towards the edge of the road. Do not brake before signalling left, and once moving in, keep an eye on the "parking dot" to make sure you don't get too close. Push the clutch in (and push it all the way in) only once the car is about to stop, and hold the brake firmly. Cancel the left signal, put the gear into neutral, engage the parking brake (again button in before you can move it, and pull it up as far as it will go before letting go of the button). Once the parking brake is engaged, you can take your foot off the brake pedal, although hands should remain on the wheel unless doing something that requires you not to.
We also practiced using the wheel to turn left (it was a road that curved left, almost like a rectangle, so plenty of left turns). The important bit about turning was making sure the dot marking the left edge (green dot in the image above) stays on the kerb. Also, hands slide on the wheel one at a time, while the other one holds the wheel and pushes in the desired direction. Hands only move between 8 and 12 o clock for the left hand, and 4 and 12 o clock for the right hand. We spent a lot of time practicing this, and he told me I can even practice at home with a dinner plate - smoothly moving one hand into position while pushing/pulling with the other, then switching to pushing/pulling with the first hand while moving the other into position.
Phew, that was one long first day of driving! Two hours, to be precise. At the end, I was dog tired, quite stiff (I was pretty tense, somehow!) and waiting for my couch :D

2 comments:
I loved this post ! Im really missing my lessons and I feel like ive forgotten everything. The hardest part for me is finding and keeping the car going at the biting point, i never seem to manage my feet !
yeah, it's really tricky! I rented a car once and it kept stalling all the time... at one stage, so badly that I literally asked someone to help me get it out of a tricky spot! i clearly need a lot more practice myself :) the Nissan Micra I learned in was very forgiving though... that's probably why i passed my test :D
Post a Comment